


After Rollover – Record Processing & Cleanup
This guide begins after the annual SIRAS rollover has run. Use it to find records that did not roll over, resolve Pending records that were intentionally held back, identify expected records that have not entered your scope, manually process records that are ready, and complete final rollover cleanup.
For work that must be completed before rollover, see Before Rollover Help. For an explanation of the future-year information used during rollover, see Next Year’s Data Help.
What Are You Seeing After Rollover?
Use what you can see in SIRAS to determine which after-rollover workflow applies.
| What you see | What it usually means | Start here |
|---|---|---|
| You can access the record and it is Pending | The record remained in the prior scope and was intentionally held back from rollover. | Section 1 – Review Pending Records |
| You can access the record, but it has an old Rollover Date | The record is already within the administrator's access but did not advance into the new school year. | Section 2 – Rollover Date Review |
| The record is still listed only under Incoming | The expected Next Year's Data assignment was not applied, so the record has not yet entered your district, school, or provider scope. | Section 3 – Incoming Views |
| The record is accessible, but the grade did not advance |
The grade may have remained the same for an expected reason:
|
First confirm whether the record actually rolled over. If it did, review the expected grade-retention conditions listed here. If it did not, use the appropriate Pending or Rollover Date workflow below. |
1. Review Pending Records That Did Not Roll Over
Some student records may still be Pending after rollover because they were intentionally held back before rollover. After rollover, review each of these records and determine why it remained Pending and what should happen next.
The decision to hold a record back as Pending is a before-rollover process. At this point, the goal is to resolve the reason the record was held back and process the record appropriately.
Process each Pending record based on its current situation
| Why the record was held back | What to confirm after rollover | What to do next |
|---|---|---|
| CALPADS error | Confirm the CALPADS error that required the record to remain behind has been resolved. | Make the record Active, then manually roll over the record. |
| ESY | Confirm ESY staff are finished with the record and it no longer needs to remain in the prior-year state. | Make the record Active, then manually roll over the record. |
| Open meeting | Determine whether the meeting will continue into the new year or can now be closed. |
|
| Student will not return | Confirm the student will not be returning to the district/program. | Make the record Inactive. See When Students Leave, Stop Participating, or Become Inactive. |
Continue reviewing Pending records until each one has either been activated and processed, intentionally left active because work is continuing, or made inactive because the student is not returning.
2. Find Other Records You Already Have Access To That Did Not Roll Over
This search is for administrators reviewing records they already have access to. These records are still within the administrator's current district or school scope, but the rollover was not applied and they still carry a prior-year rollover date.
If a record is still visible only through an Incoming view, its future district, school, or provider assignment was not applied. The receiving user does not yet have normal access to that record and therefore cannot find it with a Rollover Date search. See the next section instead.
For records already in your access, use Rollover Date to identify records that still need review.
- Click Search.
- Add the criterion Rollover Date.
- Search for dates earlier than July 1 of the current school year, for example: < 7/1/YYYY.
- Review the resulting records individually.
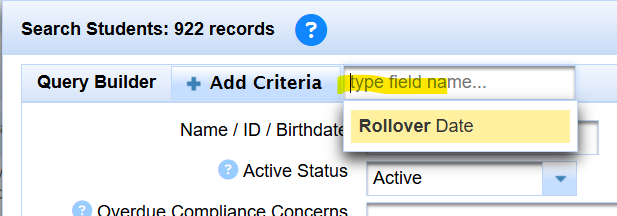
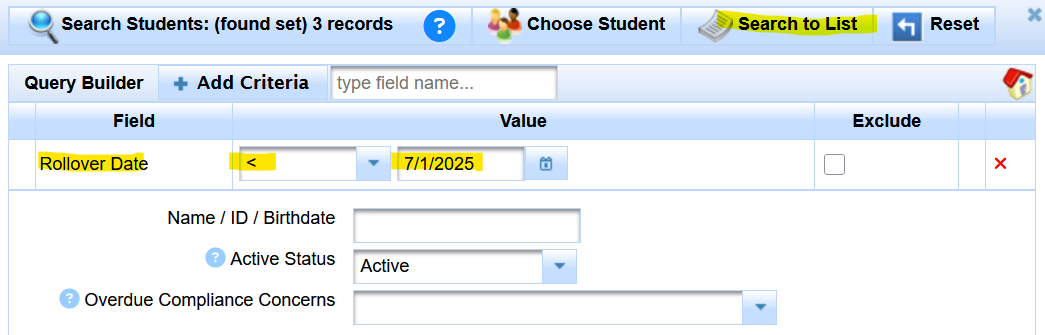
Common reasons a record may still show a prior-year rollover date include:
- The record was Pending at rollover.
- A meeting or other required work prevented the record from being advanced.
- The record did not have Next Year’s Data and needs review before grade advancement.
A grade that did not advance is not, by itself, proof that rollover failed. Use the “What Are You Seeing After Rollover?” table above to distinguish a grade-advancement issue from a record that actually did not roll over.
3. Use Incoming Views to Find Records That Have Not Entered Your Scope
After rollover, the Incoming options in the Scope dialog are a separate way to identify records that were expected to move into your district, school, or caseload but did not roll over.
If the record did not have Next Year's Data applied, the future district, school, or provider assignment was never processed. That means the receiving administrator or provider does not yet have normal access to the record. They cannot search the record by Rollover Date because it is still outside their current scope.
What a record still showing as Incoming means after rollover
| User / Scope | What Incoming means after rollover | What the user should do |
|---|---|---|
| District administrator | A record expected from another district has not yet transferred into the district because its Next Year's Data has not been processed. | Contact the other district to confirm when the record will be processed and manually rolled over. |
| School administrator | A record expected from another school has not yet moved into the school because its Next Year's Data has not been processed. | Contact the sending school or appropriate district staff to confirm when the record will be processed and manually rolled over. |
| Provider | A student expected on the provider's caseload has not yet had the new provider assignment applied. | Contact the staff member who assigned the student to confirm when the student's Next Year's Data will be processed. |
Review Incoming after rollover
- Open the Scope / Change Scope dialog using the schoolhouse control.
- Select the applicable Incoming view.
- Review any records that are still listed after rollover.
- Treat those records as expected records that have not yet entered your scope.
- Follow up with the sending district, sending school, or assigning staff member as appropriate.
- Recheck the Incoming view after the record has been processed. Once Next Year's Data is applied, the record should move into the expected district, school, or provider scope.
Because the record has not yet entered the receiving user's normal scope, the necessary rollover work must be completed by staff who currently have access to the record.
Request Transfer is a separate workflow used when a student moves between districts during the school year. During the after-rollover period, contact the sending district or school and ask when the student's Next Year's Data can be manually processed. When the sending side uses Advance and Apply Next Year's Data, the future assignment is applied and the record transfers into the appropriate new scope.
Before rollover vs. after rollover: Before rollover, Incoming views provide a preview of records expected to enter a future district, school, or caseload. After rollover, a record that is still Incoming is an exception that should be followed up on because its future assignment has not yet been applied.
4. Manually Roll Over Records That Are Ready
Once the reason a record was held back or missed rollover has been resolved, an authorized administrator who already has access to the record can manually apply the rollover. This includes records identified through the Pending review or Rollover Date search above.
The receiving user does not yet have access to those records and cannot manually roll them over. Follow the outreach process in Section 3 so the staff who currently control the record can process its Next Year's Data.
- Confirm the record is in the appropriate Active status.
- Open Student Info > Next Year’s Data.
- Review the Next Year’s Data that will be applied.
- Use Advance and Apply Next Year’s Data.
In that situation, make the record Active and allow the meeting work to continue. Manually roll over the record only after the meeting can be appropriately closed and the record is ready to advance.

5. Rollover Cleanup
Once the records that missed rollover have been processed and expected records have entered the correct scope, complete a final rollover cleanup. The checks differ depending on your role.
District Administrators – Confirm Newly Transferred Records
For records that entered your district through rollover, confirm the MIS page reflects the student's actual beginning-of-year enrollment and special education responsibility.
- Confirm the District Enrollment Date is correct.
- Confirm the School Type and School Attending are correct.
- Confirm the appropriate providers are assigned.
- Confirm the DSEA – District of Special Education Accountability is correct. See DSEA / District of Special Education Accountability.
- Confirm the record has the correct Active / Inactive status. If the student will not enroll or return, see When Students Leave, Stop Participating, or Become Inactive.
- Complete and archive required Plan Adoption work.
When appropriate, fields such as School Attending and District Enrollment Date can be updated for groups of students using Batch Edit.
If you have more than approximately 50 incoming students and need assistance with batch processing or archiving, contact SIRAS Support.
School Administrators – Confirm Expected Students Arrived
- Confirm that all students you expected to transfer into your school are now present in your school scope.
- Review and update provider assignments as needed.
- Work with your district administrator when a record did not arrive, enrollment information needs correction, or a district-level change is required.
If an expected record is still visible only through Incoming, return to Section 3. The record has not yet entered your school scope.
Providers – Confirm Your Caseload Is Complete
- Confirm the students you expected to receive are now on your caseload.
- If your caseload is incomplete, see Manage Caseload for assistance with completing your caseload.
If an expected student is still visible only through Incoming, return to Section 3 and follow up with the staff member who assigned the student.

