


Saved Lists & Queries: Save, Link, Share & Reuse
Use saved queries and saved lists when you want to reuse a reporting setup instead of rebuilding it each time.
You do not need to save or share anything to use Search or Student Lists. Use this article only when you have a query or field layout worth reusing.
Contents
| 1. Save a Query | 2. Save a List |
| 3. Link a Saved List to a Saved Query | 4. Share Saved Work |
| 5. Reuse the Saved Setup | 6. Reuse a Saved List in Data Export |
1. Save a Query
A saved query remembers the search criteria used to build a Found Set.
- Open Search and build the query.
- Run the search and confirm that the Found Set is correct.
- Select Modify to return to Search.
- Open the Saved Queries tab.
- Enter a clear name in Save Query As.
- Select Save New Query.
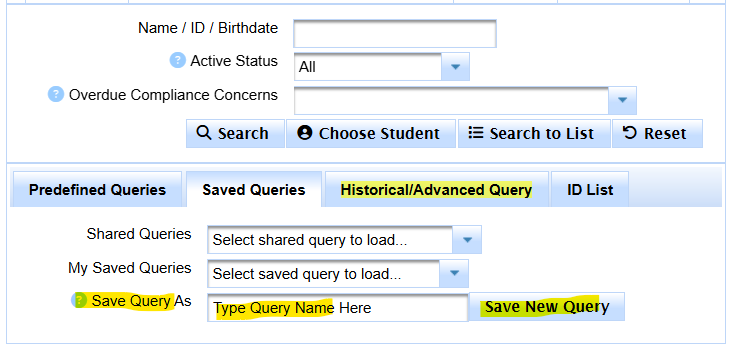
Save the query only after confirming that it returns the intended students.
For query-building instructions, see Search Help.
2. Save a List
A saved list remembers a set of fields and their display order. It can be loaded with whatever Found Set you are currently using.
- Build or customize the Student List.
- Open Edit List.
- Enter a meaningful name in Save List As.
- Select Save.
See Student Lists: View, Customize, Sort & Group for the complete List procedure.
3. Link a Saved List to a Saved Query
When a list and query belong together, link them so the saved setup can restore both the intended students and the intended fields.
- Save the query first.
- Save the list.
- Select the saved list from My Saved Lists.
- Use Link to Search Query and select the saved query that belongs with that list.
- Test the saved setup to make sure it returns the expected Found Set and list columns.
A query answers which students; a list answers which fields. Linking them creates a repeatable reporting setup without making a new permanent copy of the students.
4. Share Saved Work
Share a saved list
Lists can be shared only after they have been saved.
- Select the list from My Saved Lists.
- Select Share.
- Choose the appropriate sharing scope available to you.

A saved list can be shared after it has been created.
Share a saved query
Queries can also be shared only after they have been saved.
- Select the query from My Saved Queries.
- Select Share.
- Choose the appropriate sharing scope available to you.
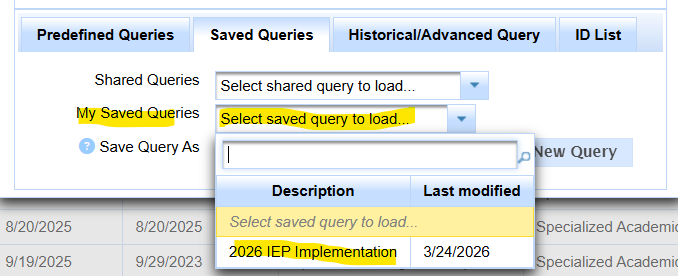
Select the saved query and then choose Share.
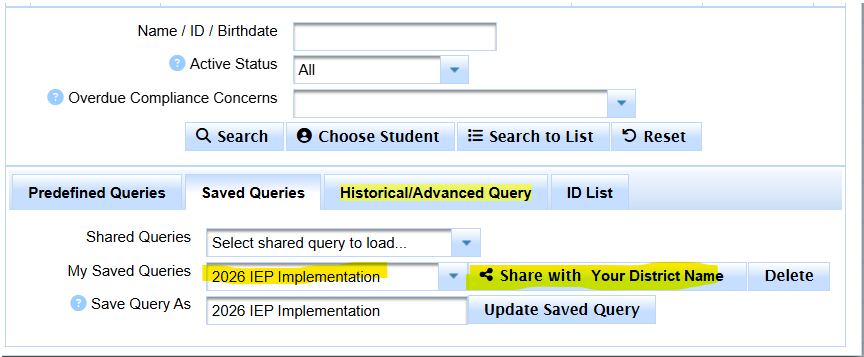
Choose the appropriate audience or scope for the saved query.
Use descriptive names and verify the query and list before sharing them with a district or larger group. Shared items should be understandable without relying on the creator's memory.
5. Reuse the Saved Setup
Saved work is most useful when the name explains both the population and the purpose. Examples:
- Upcoming Annuals — Case Manager Review
- Active Students — Credential Audit Fields
- New Referrals — SSID / Pending Review
Load the saved query when you need the same population criteria. Load the saved list when you need the same fields. When they are linked, use the saved list/query pair as the repeatable setup.
6. Reuse a Saved List in Data Export
A Saved List can also serve as a reusable export field set. This avoids maintaining one field definition for the screen and another for the export.
Open Tools → Data Export, select the Saved List, and load it as the export field set. See Data Export Help for the complete export procedure.

