


Overview of Predefined Queries, Lists, and Reports
SIRAS provides 3 main methods of finding and viewing student information in aggregate.
Search Query: restricts the found set of students by various criteria
Student List: view, sort and group the found set by selected data points
Statistics Reports: view the counts of students within the found set criteria, grouped by selected data points
Predefined Queries, Lists and Reports
Inside the Search panel, there are many useful queries, grouped by category.
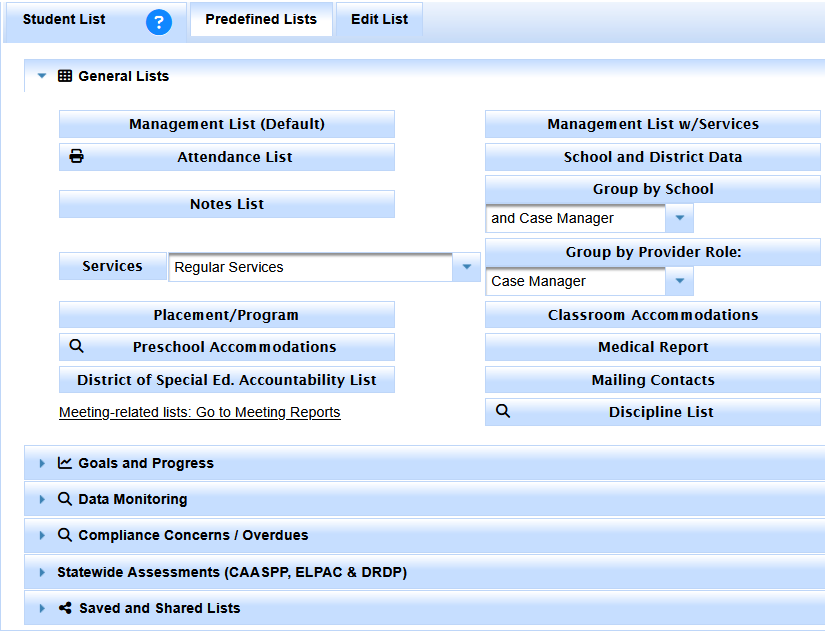
On the Student List page, inside the Predefined Lists tab are several useful lists.
Many of the Predefined Queries will also pull up a corresponding list, and many of the Predefined Lists also have a recommended Search.
In some categories there is a checkbox option to bypass running the associated Search or List, in case you want to keep what you already have.
This area is regularly a work in progress as there are many queries useful for various purposes.
- More details about the different queries to be completed here, pending re-categorization -
Browse Knowledgebase Articles for Queries, Lists and Reports
Description of Predefined Lists
(Oct. 2024 note: may be out of date)
List column - These lists will show data from students in your current found set.
- Management List (Default) provides basic special education data: school attending, birthdate, grade, last IEP date, Last Tri date, Primary disability, and primary service.
- Management List 2 provides similar information in a slightly different format: grade, primary disability, birthdate, primary contact information, school attending, and a list of all current/pending services.
- Service List shows the school along with a detailed list of all services, including the provider, frequency, location, and duration of each service.
- State Assessment List shows all students along with the way they participate in statewide assessment (SBAC and Science) along with all the specific universal tools, designated supports and accommodations entered on the CAASPP page of the IEP.
- Notes List shows all students and if there any notes entered into the students record
- (under Student Info/Student Profile/Notes) they will appear next to the students name.
- By School and either by school attending, case manager, placement or program provides the basic information found in the default management list.
- Meeting History shows a list of all IEP meetings stored in SIRAS for each student.
- Mailing Contact shows the primary contact for the student, relationship, phone, secondary phone and address for the contact person.
- Placement/Program shows placement in RSP, DIS or SDC, Program and the last date of placement change.
- Areas of Need and Service Minutes shows the current goal areas of need and total daily service minutes.
- Classroom Accommodations - shows the student accommodations by category from the current IEP.
- Next Years Data shows current district/school, current/pending services, current providers and next years grade, district, school, services and providers. This data comes from the use of a Record of Changes for Next Year IEP form and from data entered in the Next Years Data tab.
- Medical Report shows the students primary and secondary disability, whether they have a health/emergency care plan, medications, allergies, asthma, diabetes, hearing, and vision.
List and Search column- These lists will perform a Query first, then show you those results.
- Validation Errors and Warnings shows student records with data validation errors and warnings
- CAASPP Assessment List shows the students grade, how they will participate in ELA, math and science state testing and the supports/accommodations listed on the IEP.
- Discipline List - shows only the students who have discipline records entered into SIRAS.
- Meetings Held/Not Finalized - shows only the students who have meetings marked as held, but are not yet finalized.
- EL Test Participation shows how students will participate in English Language Proficiency assessment (ELPAC) and the supports/accommodations in Reading, Writing, Listening and Speaking listed on the IEP.
- Transportation shows special requirements, provider, therapy, route, aide, type, level, address, notes and next years transportation.
- Preschool Accommodations shows the supports for preschoolers from the Preschool Strategies IEP page.
- Post-Secondary shows follow up data in Education and Employment from the most recent June reporting.
- Transition Reg. Indicators shows students with transition data in all 8 required areas.
- Goal Progress Report & Benchmark Progress Report this is a summary of the progress reports that can be used to audit staff making sure timely progress reports are being completed.
- Parent Withdraw / Private School Follow-up this list is used to monitor private school students where plan type is Eligible no IEP and placed in private school.
When using the Field Set + Search buttons, it will remove your existing found set with a predefined query. You still can use these lists for a custom query, you just would have to redo a search and go back to the list one more time.
All of the above lists can be grouped by School or by School and case manager, School and placement (DIS, RSP, SDC), or School and Program (S/L, APE, Full Inclusion, etc.). This grouping feature has limited value for general users since they generally do not have multiple schools. Also, as many districts do not use these last two designations (placement and program), they may be of limited value to general users.
Below is a quick guide to Customizing the Predefined Lists:
- Select the list that is closest to what you want.
- Click on Edit List.
- Click on any item you wish to remove from list, then click Remove.
- From the list of search items that can be used for the Columns in the report, select any item you wish to add and click Add. The items in the list are organized by categories to make it easier to find the one you need. If you know the name of the item you are looking for you can begin typing the name and it will take you to that item.
- Items will print out from left to right in the order they appear from top to bottom on this list.
- Move items up and down on the list using the up and down arrows.
- Once the items on the list are in the desired order, click on Update List.
- The updated (revised) list will appear below in place of the original list you selected.
- If the list is one you might wish to use again in the future, save it by putting a name to the right of Save As.
- The new list will go into your Saved Lists so that you can bring it up again by clicking Load.
Refer to the document on Using the Search Feature in SIRAS for ways to select specific students prior to opening a list. The combination of searching for particular students and customizing the lists can be very powerful in terms of case management. Many service providers create different lists for different purposes. It is generally a good idea to have one list that contains special education data to help keep track of due dates and another one for contact information that can save time logging into SIRAS to get parents phone numbers or other contact information.
You can also use the check boxes along the right side of the list to select specific students to include or omit from the list. Check the box next to the names of the selected student(s). Once you have selected all the students, click on the arrow to the right of the box and it will bring up a menu of choices: Find only marked, Omit marked, or Save marked as a query so you can pull up those same students again without having to check the boxes. Once you have made a selection, you can then print the list(s) for the group(s) defined by your choice. To bring back all of the records, click on Reset Search at the top of the screen.

