


My Account / Manage Users
![]()

My Account
Additional related help guides
User Account
User Account: Click Here for more information on changing your user information.
To change your own account information click the 'Edit Account Details' button.
![]()
When done editing your (or other user's account information), click the Update User Account button
![]()
My User Account as General User type user account.

User Account as seen by Admin User

Admin users notice the Choose User and Create New User Buttons
If Admin user needs to reset a password or deactivate user, click the Edit Account Details button to find the Reset Password and Deactivate buttons.
![]()

Both General Users and Admin Users See:
Username is the name that you would log in with. It must be unique to any other user without spaces. The user name does not show in forms.
Password must be at least 8 digits and must be entered twice to confirm.
First/Last Name is the name that will be on the forms. It does not necessarily have to be unique like the username.
Phone will be used for contact information on the forms and in the program
Email Address should be your work email, and is important to be input correctly as it will be used for the Reset Password and other functions.
User Access Roles: This is where the user is assigned their level of access to SIRAS. The default is "General User". See Access Roles Help for more information.

Student Assignments
Student Assignments:
The student assignments tab is where user accounts are assigned to students individually with a designation like 'case manager'.
General User type accounts can see their entire caseload here. This is not the only way to find your students.

Admin staff with access to Manage Users can adjust provider caseloads here with the feature buttons at the bottom of this area.

Personnel Data
Personnel Data:
My User Account as General User type user account.
This area may contain information about the user's personnel profile. This area is not commonly used in SIRAS as it is best managed by a dedicated personnel database.

User Audit
User Audit:
My User Account as General User type user account.
This tab contains other information about the user account, including changes made to student data, and history of changes made to the account.
![]()
Edit Preferences
Edit Preferences - Click Here for more information on Preferences
This tab controls the look and various preferences available to SIRAS user accounts.
Manage Users
![]()
Choose user button:
To modify an account you must first locate the user account. Enter a few letters of the user name (first or last, whatever is most unique). Use the filters to the right to locate groups of users with common districts/schools or common user access levels.
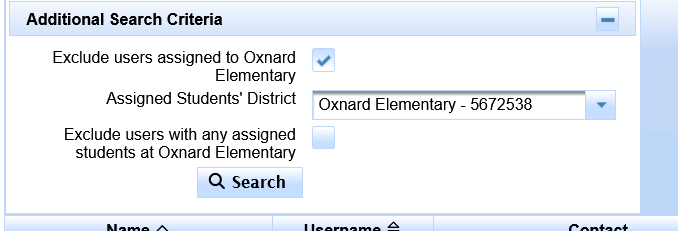
Additional Search Criteria:
- Assigned Students' District
- Exclude users with any assigned students having this district
- Exclude any users assigned to the topmost selected district
Additional columns to view:
- Assigned Students' Districts
- Last Login
- # of Assigned Students
Method to find 'out of district' staff assigned to local students.
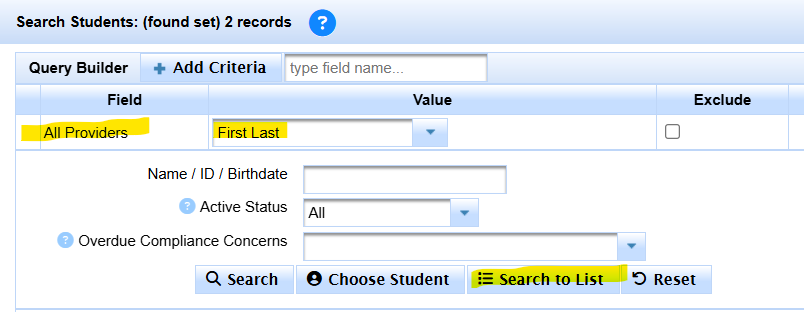
In order to find the students these staff are assigned:
- Click Search
- Add Search Criteria 'All Providers'
- Enter 'First Last' of username seen.
- Search to List
Create new user button: is used to create a new user. SIRAS will not allow duplicate users. If trying to create a new users and you get an error message indicating that a user with the same name already exists you will need to contact the SELPA CASEMIS Clerk or [email protected] who can Reactivate the user or Transfer or Add the user to your district/school.
When creating a new user,
- Make sure to use firstname.lastname all lower case as the username.
- Click the Assign Default Password

- Fill in the First name
- Fill in the Last name
- Fill in their work email (must be unique)
- Click the Create New User button

- Once the User account has been created, please note the temporary password displayed at top of page.
- Send user their username, temp password and the login url you use for Siras.

Reset Password
- Click Edit Account Details
- Click Reset Password
- Take note of default password at the top of the page
![]()
![]()

Manage Users - Student Assignments
Manage Users - Student Assignments

- Add Student Assignments - Click to add a found set of students at once to the current user selected
- Select All - Click to Select All students see in the list
- Clear Selection - Click to remove any selections of students
- Remove - Remove selected students from current user selected
- Reassign - Reassign selected students from current user selected
Student Assignments has quite a bit of features to explore, see THIS PAGE for more details.
Site Assignments
Site Assignments
- SELPA staff need not have any Site Assignments.
- General Users will not see this tab.
- All other staff should have at least one District Site assignment.
- General users need to have their home district assigned, it will not grant access to all students at the district.
- District level users will have their home district assigned, combined with district level user role, this will give district level access.
- School level users will have their home district assigned, this will not grant access to all students at the district.
- School level users must have at least one school site assigned, combined with school level user role, this will give school/site level access.
- Staff with multiple district or school assignments can use the 'default' option to select their default login preference.


