


SIRAS can store documents with a specific meeting or with the student record generally, including assessment reports, supporting documents, signed pages, medical documents, and forms produced outside SIRAS.
Choose the location based on what the document belongs to. A meeting-specific document should normally stay with that meeting; a general student document should normally go in the student's Documents File.
Upload to a meeting: Choose student → IEP Manager / Forms Manager → open the meeting → Uploaded Documents → Upload File Upload to the student record: Choose student → Student Info → Student Profile → Documents File → Upload File
Choose Where to Store the Document
| Upload location | Use it when | Navigation |
|---|---|---|
| Specific meeting | The document belongs to one meeting, should appear with that meeting, or will be attached to or replace a meeting form. | IEP Manager / Forms Manager → open meeting → Uploaded Documents |
| Student record | The document applies to the student generally and is not associated with one specific meeting. | Student Info → Student Profile → Documents File |
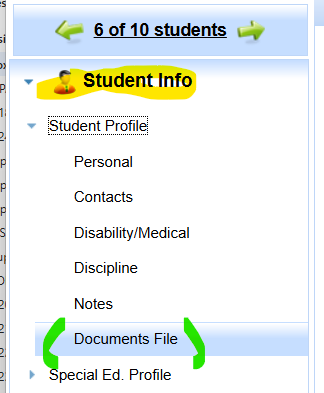
Use Student Info → Student Profile → Documents File for documents that belong to the student record generally.
Side Menu path to documents screenshot
Tool Menu path to documents screenshot

Use the meeting's Uploaded Documents tab for documents that belong to a specific meeting.
Example: Upload a Document to the Student Record
Path: Student Info → Student Profile → Documents File → Upload File
- Open the student record.
- Go to Student Info → Student Profile → Documents File.
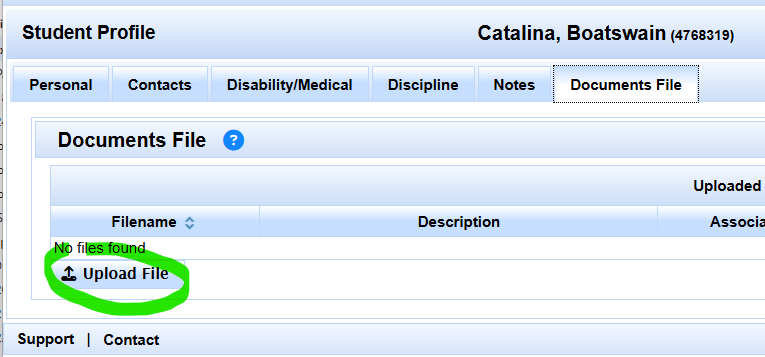
- Scroll to the bottom of the page and select Upload File.
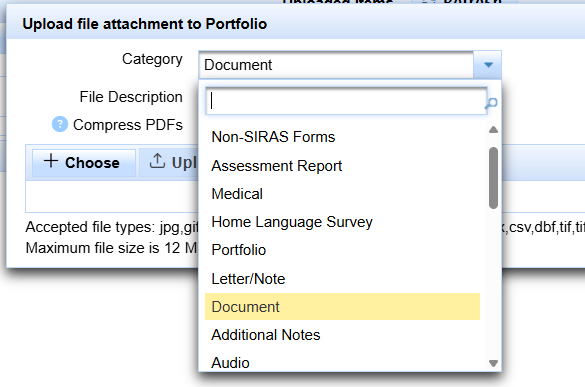
- Select the appropriate Category.
- Enter a clear description of the document.
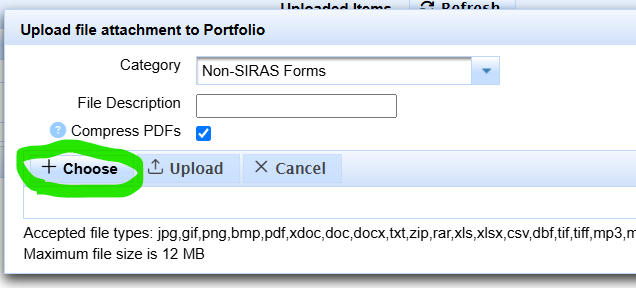
- Select Choose and locate the file on your computer.
- Select Upload.
Step 3, Click Upload File
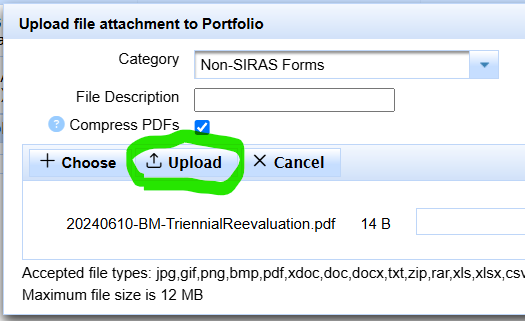
For forms produced outside SIRAS, select Non-SIRAS Forms or Document or whatever category is correct.
Enter a file description as appropriate
Then select Choose to locate the PDF.
After the file is selected, click Open

review the upload choices and select Upload.
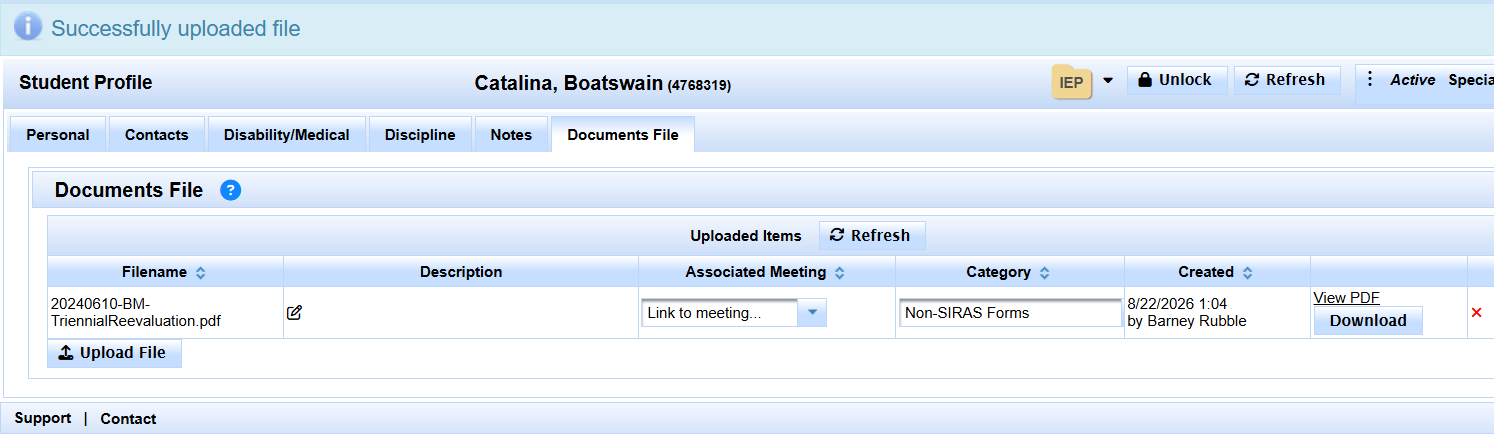
Look for the successfully uploaded file message at the top after uploading.
Example: Upload Non-SIRAS or other Forms to a Meeting
Path: Open student → IEP Manager / Forms Manager → open the meeting → Uploaded Documents → Upload File
Use them for supporting documents, single-page additions, documents produced outside SIRAS, and individual form attachments or replacements.
- Open the appropriate meeting in the IEP Manager / Forms Manager.
- Open the Uploaded Documents tab.
- Select Upload File.
- Use Append to / Replace Form to choose where the document belongs:
- N/A: stores the document with the meeting without appending it to a forms area.
- Pre-Meeting: includes the document with Pre-Meeting forms.
- Basic Meeting: includes the document with Basic Forms.
- Assessment Report: includes the document with Assessment Reports.
- ISP: includes the document with ISP forms.
- Select the appropriate Category. Available categories depend on the selected forms area and determine whether the upload is attached or replaces an existing SIRAS form.
- Enter a clear File Description, such as Psychologist Report.
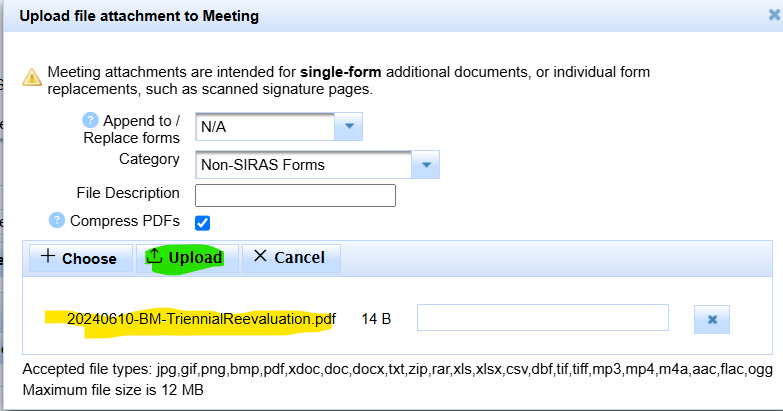
- Select Choose, locate the file, and then select Upload. (see screenshots below)
Select Student and go to IEP manager

Click on the Uploaded Documents Tab, then click Upload File
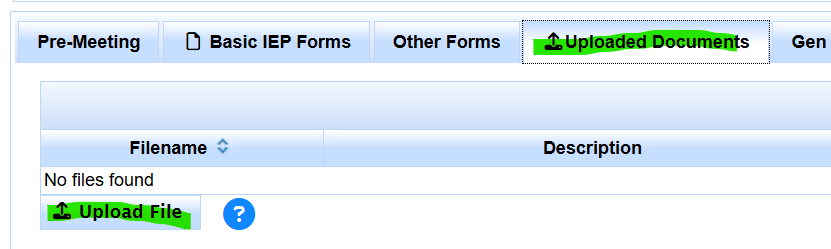
Select Category Document or whatever is appropriate
Click Choose
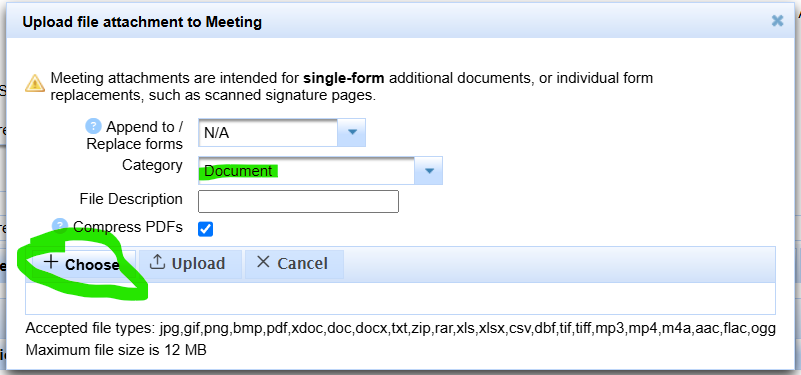
Sele
Then select Upload to locate the PDF.
Select the file and click Open

After the file is selected and opened, review the filename before you upload.
Maybe update the Category and Description if needed
Then when everything is correct.
Select Upload to post this to the meeting.
or Cancel if we don't want to commit this PDF.
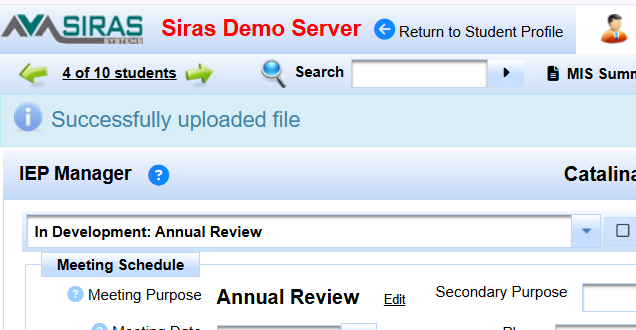
When the file is posted, look for Successfully uploaded file message up top.
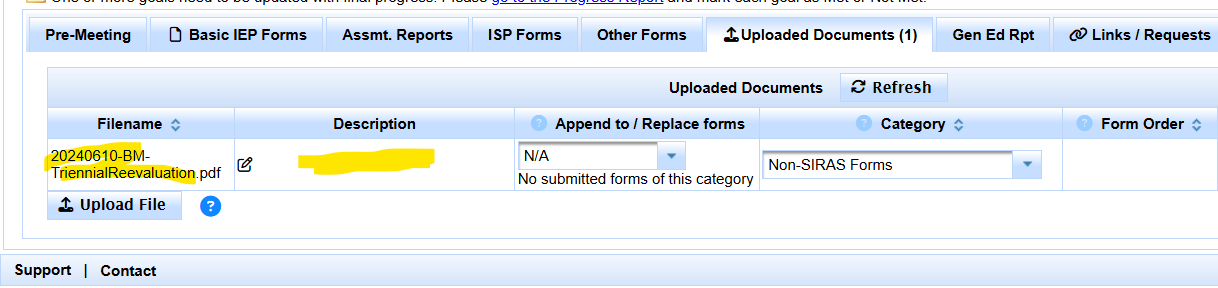
Review the filename and description one more time.
Remove if it is not the correct file.
Attach or Replace a Form
Attach a Document
Choose an option under the Attachments portion of the Category menu when the uploaded document should be added to the meeting without replacing a SIRAS form.
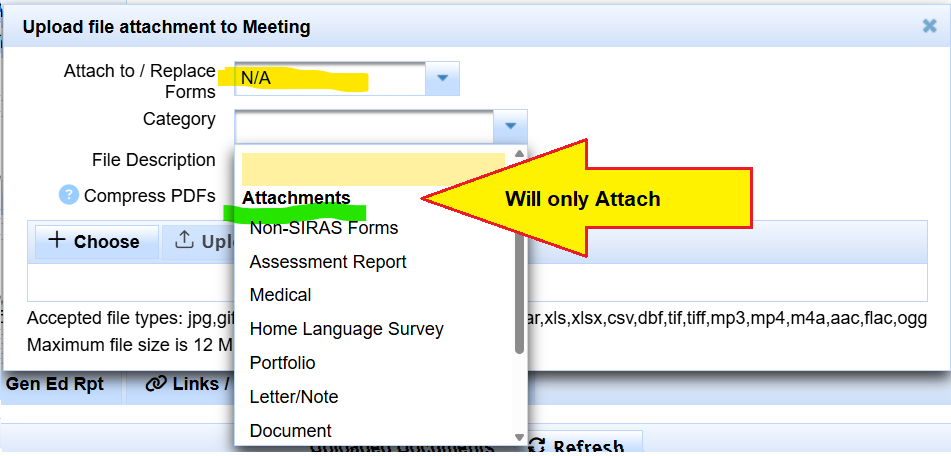
Replace a SIRAS Form
Choose the specific form under the Replacement Forms portion of the Category menu when the uploaded PDF should replace a SIRAS-generated form in the assembled meeting document.
The replacement choices displayed in the menu depend on the selected Forms Manager area. Use the form name shown in the current menu rather than relying on a static list of replaceable forms.
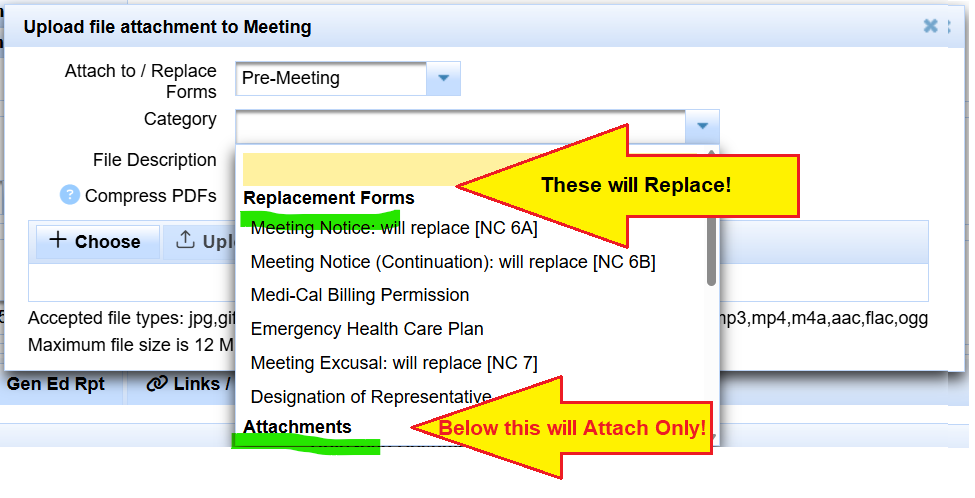
An attachment adds the document to the meeting. A replacement substitutes the uploaded page or document for the selected SIRAS form in the assembled meeting packet.
View or Delete Uploaded Files
- To open an uploaded document, select View PDF or Download at the right side of the uploaded-files list.
- To delete an uploaded document, select the red X at the right side of the list.
- If an action control is outside the visible area, first scroll horizontally or widen the browser window. If necessary and comfortable for you, temporarily reduce browser zoom and refresh the page.

File and Storage Guidelines
- Use one of the file types accepted by the current upload dialog.
- Use a short, simple filename without extra periods, slashes, or unusual characters.
- Do not include a student's full name or date of birth in the filename. Use initials or an appropriate student identifier according to district policy.
- Check the upload dialog for the current maximum file size. Reduce or compress files that exceed the displayed limit.
- SIRAS is not intended for storage of large audio or video files. Use district-approved secure cloud storage when appropriate.
- Do not upload the full finalized IEP PDF back as a meeting attachment merely to preserve another copy. SIRAS already maintains the finalized electronic IEP record and can reproduce its PDF when needed. See Finalized IEP Records and PDF Archival.
Resolve Upload Problems
If a file will not upload:
- Rename the file using a short name with no extra periods, spaces, slashes, or special characters.
- Save the file locally before uploading if it is currently stored on a shared or remote drive.
- Confirm that the file type is accepted and that the file does not exceed the maximum shown in the upload dialog.
- For PDF files, try clearing the Compress PDFs checkbox.
For detailed filename examples, privacy guidance, and file-size troubleshooting, go directly to Having Trouble Uploading a File into SIRAS?
Create a Placeholder for a Meeting Completed Outside SIRAS
If meeting forms were produced outside SIRAS, a placeholder meeting can preserve the meeting in the student's history and provide access to the uploaded forms.
- Create a meeting with the correct Meeting Purpose and the date on which the meeting occurred.
- Do not complete forms in the SIRAS Forms Manager.
- Upload the meeting documents and select the Non-SIRAS Forms category.
- Select Set Meeting as Uploaded Documents Only.
- Finalize the meeting.
The placeholder should represent what occurred; do not invent or change dates merely to make the record easier to close.
Verify the Result
- Student-record upload: confirm the document appears in the student's Documents File and opens/downloads as expected.
- Meeting upload: confirm the document appears under Uploaded Documents for the intended meeting.
- Attachment: preview the meeting packet when appropriate and confirm the document appears with the intended forms area.
- Replacement: preview the assembled meeting packet and confirm the uploaded PDF replaces the intended SIRAS form—not a different form.
- Uploaded Documents Only meeting: after finalization, confirm the meeting remains visible in the student's history and the uploaded documents can still be accessed.

