- Do not create accounts for CDE staff!
- FMTA CDE Access is intended to provide FMTA direct access to specific student records.
- CDE accounts are maintained by Siras Systems staff on behalf of your SELPA.
- One FMTA only needs one account for any number of SELPA they may be working with.
- Depending upon SELPA preference, FMTA may have multiple accounts.
Your SELPA has already created a SIRAS account to be used for giving a CDE representative access to student records within your LEA. Check with SELPA to confirm this person’s name, as that is what you will be searching for when assigning student records to be reviewed by CDE.
If you can not find the correct account for your FMTA, contact [email protected]
Step 1: Find student record
Click into the quick search box: ![]()
Type the first two letters of the students first name, then a space then the first two letters of the students last name then hit the enter button and a short list of students will come up. Alternatively, you can search on student id, dob or ssid in this field. In the list that comes up you can right click or control click the students name to get a navigation menu.
Step 2: Attach additional documentation (if needed)
If there is any documentation that CDE needs in reference for the student record that isn’t already in the SIRAS record, it can easily be uploaded and attached for review in the Documents area of SIRAS.
However, since the CDE cannot download any documentation we need to ensure any documentation uploaded into SIRAS is already in PDF format so they can preview it within the program.
If you have a MS Word document, most computers now can print the document into a PDF format by switching the printer icon in the print dialog box to a ‘Print to PDF’ type option. You may need to check with your site IT person for identifying or installing this option on your computer. Alternatively, the document, if printed on paper already, can be scanned to a .PDF format at the main copier in your DO.
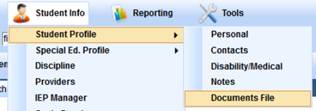
Click on Student info and select /Student Info/Student Profile/Documents file:
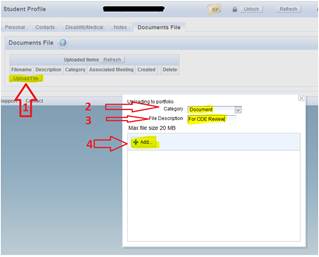
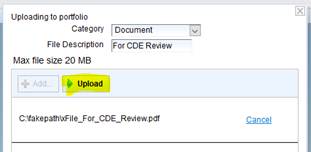
Click on Upload File (see screenshots below)
Choose a Category, like ‘Document’
Type an appropriate brief File Description
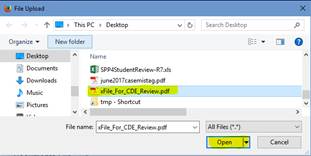
Click the ‘+Add…’ button and navigate to where the .PDF document is on your local computer.
Once you see the document, click on it then click the ‘Open’ button
Then verify the correct document was selected and click the ‘Upload’ button.
Repeat those steps as needed for additional documentation.
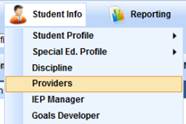
Step 3. Assign Access
Click on the Student Info menu and choose ‘Providers’ to go to the area to assign access.
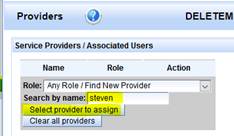
Search for the CDE Persons first or last name in the ‘Search by name:’ area.
Then click the ‘Select provider to assign’ button.
If your District is listed in the choose user dialog box, click on the menu and choose the blank area at the top to search all accounts in SIRAS. Once you assign the first student in your district, the name will be easier to find.
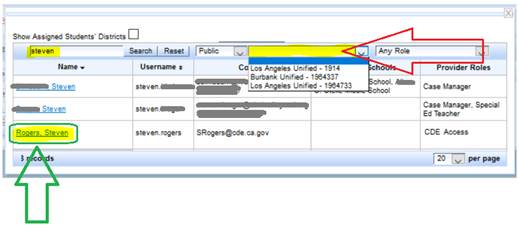
When you see the correct account in the list, click on the name on the left-hand side.
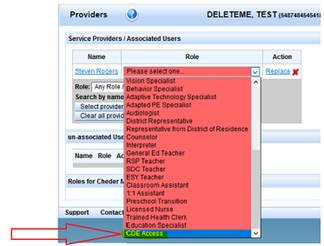
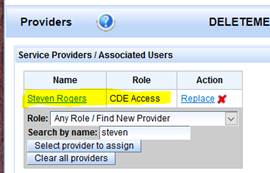
Then you can assign the role of ‘CDE Access’. This is just like assigning any other general user role.
If you have any questions on this process, please don’t hesitate to contact us at: