Transferring records can be done in a variety of ways.
Only users with Administrator level access can transfer student records.
Direct Transfer:
Go to the MIS Summary page, unlock the record and change the School or District (if SELPA Admin).

By changing the school, district attending or district of residence, this constitutes a transfer and will log a transfer record.

Requesting Transfer:
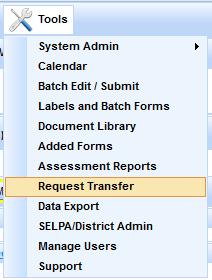
When a student is new at a school or district, the student may not be new to SIRAS and already have an existing record. If the administrator knows the student is transferring, or would like to search for an existing record before attempting to create a new record, they simply can go to the /Tools /Request Transfer page.

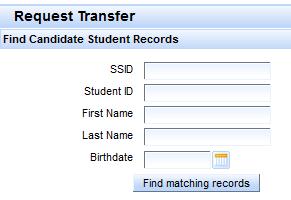
Under the Find Candidate Student Records page, enter the SSID and click on Find Matching Records. Or one can enter a partial first name and partial last name or birthdate as well.

We do not suggest trying to find candidate records by completing each field. If there is a slight variation on the spelling of the first or last name the search may miss the record the person is trying to find. Once candidate records are displayed below, the administrator can specify directly what District and School this student will be going to. Use the School Type choice to select other schools besides public schools. To create the transfer request, click on Create Transfer Request. When a CASEMIS admin from the other district/school sees the transfer request on the home page they can accept or cancel the transfer request depending upon the circumstances. Whomever requested the transfer will be notified on the Home page when the transfer is accepted or denied.
Sending a Transfer:
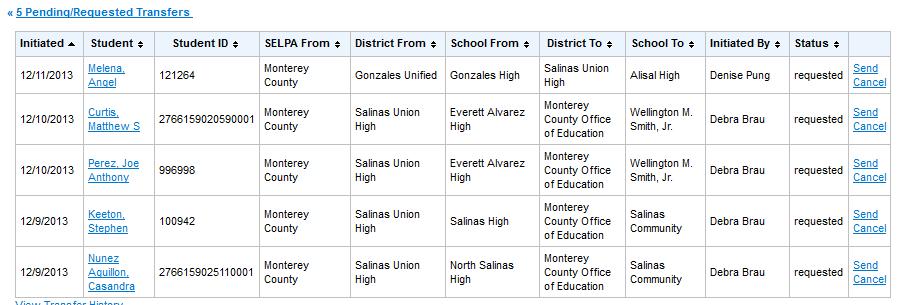
When Admins login, on the homepage will be a list of current transfer requests. Each request shows when it was initiated, info about the student, where it is coming from and where it is going with the option to either send, accept or cancel the request.

If/when cancel is ever selected, the admin can specify a reason for cancelling if needed and can put a short reason as to why if needed. Individual transfers are logged under Student History under the Student Info menu; and district Transfer History Report under the Reporting menu.
Transfer Rules:
Records that have an open meeting cant be transferred, the meeting must be finalized or deleted if no longer needed.
Records that are Inactive will be made Active upon transferring unless the record was exited as Returned to Regular Ed. These records will be left as is so the receiving district can start a secondary initial on this record. In order to start an initial on an exited record it must be exited with the proper reason, left Inactive and have old referral information left intact. Once the Initial Evaluation meeting is create the new information will be updated in the MIS Summary page.
Records being transferred from one SELPA to another also must be Inactive (or made Inactive) and given exit information when appropriate. If exit information is current for the reporting cycle that information will be used for the upcoming June Reporting Cycle.
During the CASEMIS Deadline period (when SELPA is making a final review of the CASEMIS data) transfers will not be permitted.
As an admin you will see both accept, send and cancel as options. Send indicates the record has been requested away from your district/school. Accept indicates the record is coming your way and will be added into your district/school. Cancel indicates that the transfer is to be undone with no action.
Transfer History:
Records that have been transferred are logged and admins can review information on records that have left their district in past by clicking on View Transfer History link from under all pending transfers area on the Home Page. If there are no pending transfers then you can also view it by going to the /Reporting /Transfer History Report area.
In the Transfer History Report, the name of the student is a link that will give you a snapshot of the students MIS Summary page at the movement of the transfer. In the upper right corner is an option Print transfers from date which will allow you to search for a range of transfer dates.
At the footer of the SIRAS page one can adjust how many records per page one sees and can incrementally go back in time to review when records were transferred. The list may be a bit long depending upon if you are looking at district level or school level. A useful tip is that you can use the CTRL+F or /Edit/Find option of your web browser. By invoking the Find feature of your web page you can use that to search thru the visible Transfers for a student name/id or who initiated the transfer.


